

April 27th 2024
Daniel Saunders
Next JS
SEO
Boost Your Next.js Site's SEO: How to Add Sitemap
Improving the SEO of your Next.js site is crucial for better ranking on Google. To enhance your site's visibility, adding a sitemap is essential.Follow these simple steps to add a sitemap to your Next.js application, and boost your SEO.
- Install dependencies
- Create config file
- Add script to the package.json file
- Run build script
Note: This tutorial was done with the Next.js version '13.1.6', and the next-sitemap version '3.1.52'
1. Install next-sitemap
To install the next-sitemap dependency, navigate to the root of your Next.js project in the terminal and run:
Note: Command syntax may vary depending on your package manager.
2. Create the Configuration File
Create a file named 'next-sitemap.config.js' in the root of your Next.js project. Inside this file, configure the application according to your requirements.
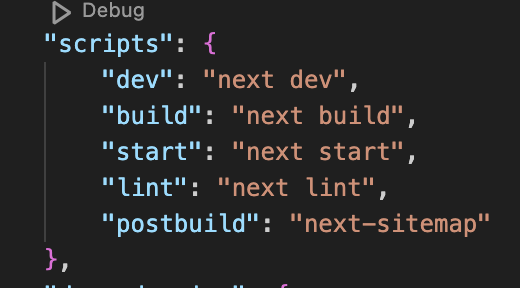
3. Add Script to package.json
Open the package.json file and add the following code to your scripts.
Your file should now resemble the following image:
4. Run the Build Script
Once the above steps are complete, run the build script by entering the following command into your terminal:
The terminal output should indicate the successful completion of the build process.
Conclusion
By following these steps, you've added a sitemap to your Next.js site, improving its SEO and making it more discoverable on search engines. Ensure to keep your Next.js and next-sitemap versions up to date for optimal performance.
NPM package: https://www.npmjs.com/package/next-sitemap
Video credit: https://www.youtube.com/watch?v=zS-6oiwvNnc